
.jpg.518c69c2d9e1581799f3c11301dc2da5.jpg)


Pete1967
-
Posts
318 -
Joined
-
Last visited
Content Type
Profiles
Forums
Events
Shop
Articles
Posts posted by Pete1967
-
-
I've never had a Jaguar so I might be off the mark here, but as long as it has a universal rout under the scratch plate (and obviously you'll need to swap the scratchplate as well) then I don't see why not. Wiring wise just should be a direct swap out for the neck Jazz I think. Make sure you get your polarity right tho. I'd recommend shielding the cavities with copper tape while you're at it (if it's not already done with conductive paint) and grounding the shielding. If it hasn't gor a universal rout then you'll need to get it routed out which isn't a big job for a guitar tech or luthier.
I have a Nordstrand NPJ4SE set in my PJ and I think it would give you the sound you want. Traditional P thump but with added middle from the jazz, and with roundwounds a modern twang too.. -
I threw about 20 lanyards away yesterday... Donation, done!
-
Conversion of a 4 string neck's not a goer IMO. Just not enouh space. You'd end up with unplayably narrow spacings and all the head stock geometry would be wrong. A 5 string neck might do it but then you'd have to rout for new pups and neck pocket, plus buy new hardware and install new pups. I guess it could be done but it's a challenge and one slip and you're left with an expensive lump of firewood...
For all the effort and expense you could just buy one.... I'm with BassBus - persevere with selling and buy a 5er. -
My first build was purple satin (with a maple FB). I'm working on a gloss orange one now (with a maple FB). Some colours just work....

-
[quote name='LukeFRC' timestamp='1351635903' post='1853657']
that's what I was going to ask - can i stick matt/satin colours under a clear coat - or would you just use a gloss colour and no clear coat?
[/quote]
Either - but you can get a better 'sparkle' with a clear coat and they tend to be harder wearing... BUT check the compatibility between the paint and the clear coat, and obviously clear coating is more work. I suppose it depends what you're looking for in the finish. For a solid colour finish not using a clear coat gives a more 'traditional' look I suppose, but if you want uber glossy and hardwearing its clear coat all the way with all the flatting and buffing that goes with it! -
[quote name='nugget' timestamp='1351532876' post='1852287']
I think you'll need a lot more than that.... unless you're sh*t hot with a spray can
Try spraying the primer let it dry for a week or 2 then rub it dead flat without rubbing through to the wood, that'll give you an idea of how many cans each stage will take. There is more rubbing with the colour and top coat as these need to be perfect (or close to) and the top coat will have the most rubbing to get the mirror gloss finish. you MIGHT get away with 2 cans of colour and top coat i you're primer is perfect and you're carefull with the sanding but be prepared to use more than that.
It's a great fun thing to do and the results can be very impressive so persevere and show us the progress
Dave
[/quote]
Good advice IME... if you want to use a clear coat on top to get that really shiny finish use the matt finish paint. It'll save you a tiny bit of work - depending on how sh*t hot with a spray can you are You could always get down to you local flyover at 2am with your hoodie on and get some practise in 
-
There's a bit of a hold up waiting for some Abalone to arrive from Australia
-
Have to say I'm a bit of a Plasti-Kote fan too. It's easy to use and gives a good finish if you follow the basic spraying rules and do what it says on the tin. Spray coats thick enough so they can flow, but not so thick they run and no more than an hour apart so that they can bind together OR leave it 24 hours and flat down with a very fine grit.
Patience is your friend (well she's mine anyway but don't tell the Mrs ) -
Duh.. sorry Paul.. it would have helped if I'd read the whole thread properly!
Glad you're sorted and enjoying it.
P -
I've never seen a Sub in any of the Leeds stores... PMT are a dealer for Musicman, but I've only ever seen Rays or Sterlings but maybe worth a call, or you might be lucky at Northern Guitars. Don't think Dawsons do MM.
It's a nice train ride up to Newcastle...
-
Simon bought some Gotoh tuners off me... he paid immediately (and I mean immediately) and the deal was smooth as silk.
Thanks Simon.
Pete -
I popped in to Jon's the other day, with his agreement (I think he was keen for me to see the colour in the flesh actually). Sorry, no pics, so you'll have to trust me...
....It's awesome ....Totally spectacular  The photos truly do not do it justice. It will outclass my playing by several times. Can't wait for it to be finished.
 -
[quote name='mike 110' timestamp='1350299325' post='1836888']
Well what can I say .... It's built like a tank and weighs almost as much ! Swamp Ash - bloody 'ell !
[/quote]
Yeah - the really light Swamp Ash is getting very hard to come by... good job you didn't choose White Ash!
[quote]
It's a beautiful looking Bass , very classy . Jon Shukers workmanship should really be seen " in the flesh " as it were , to be truly appreciated .
[/quote]
I could not agree more. Lovely bass... enjoy her! -
[quote name='untune' timestamp='1350254263' post='1836569']
If anyone is interested - we ended up sorting this today at last. First tried to cut through just the thread of the screw using a small piece of brass tube (taken from an old aerial) with filed teeth in one end. This just blunted the tube, wasn't enough strength in it.
After that we decided to just take the plunge and drilled it out - 3mm bit, same size as the original screw hole, drill press, going very very slowly and carefully. Took a good 20 mins to half an hour but we got it all in the end.
We were going to use wood glue and cocktail sticks but then found a slightly bigger piece of wood, ground it down so it made a snug fitting plug, and tapped it in with some glue. That's going to dry overnight and we're going to drill it tomorrow and mount the bridge as though nothing ever happened. Won't even be able to tell!
[/quote]
Sounds like a great job getting out of jail there.... It's a bit late now but I have 5m of 3mm basswood dowel. You'd have been welcome to a bit!
P -
-
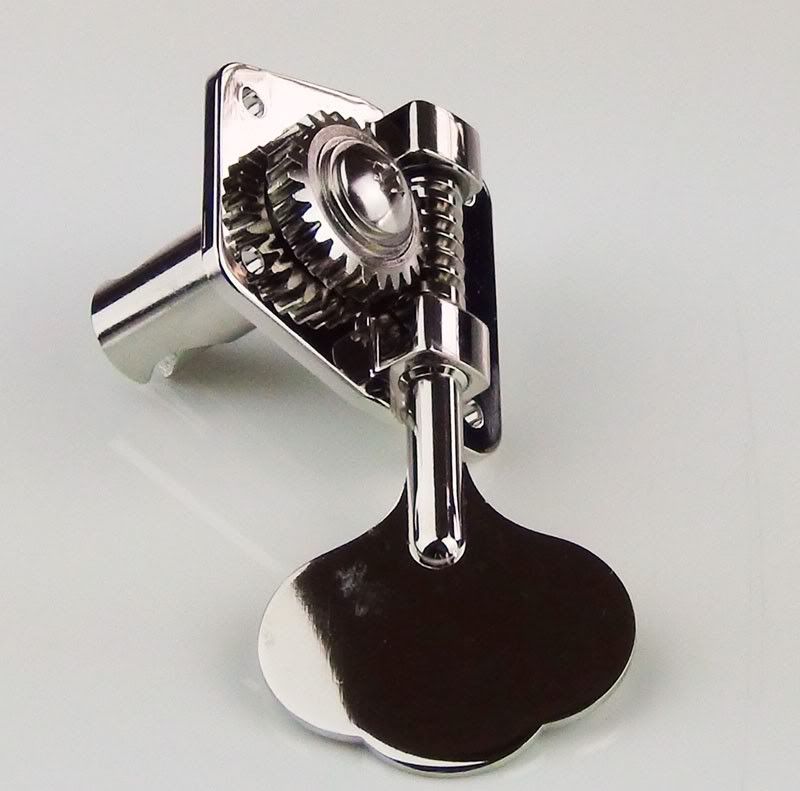
Hi All,
I have a set of four left Gotoh GB2N tuners. Bright nickel plated - all screws and bushings present. Have been fitted to a bass for about 3 months, but are in is as new condition. £43 new... first 20 quid secures, posted in the UK.
Pics later when I can find the garage key... ahem... but they look like this...
P
-
Expensive bonfire at 50 quid!
-
That's going to take a lot of TLC..... Bassbar crack... (and a lot of others) Ouch!
-
[quote name='BassBod' timestamp='1349992185' post='1833424']
Worth looking on the Music Man forum, as they've used oiled maple necks for years - Birchwood Casey gun stock oil/wax.
Try just cutting back the gloss first and see what it feels like?
[/quote]
I'd agree... try cutting back first and see what you get. Go easy with the abrasive paper if you use it and start at something like 320 so you're flatting rather than sanding off... depends how badly worn the existing finish is as to how much sanding you'll need to do I suppose. Use a radius block if you have one.
Tru-Oil is easy to apply and can give natural feeling results if you dont build up too many layers or almost a gloss finish if you do... but be patient!
My personal favourite on a maple neck is a sprayed on satin polyurethane... It's hard wearing and has a nice smooth finish once fully cured, but applying it at home is not for the faint of heart! I'm doing one at the moment and it's buttock clenching stuff each time a coat goes on.
P -
New pants please....
That's amazing.... I'm a sucker for a pearloid plate and it must be the most versatile bass ever made.
What's the verdict???? -
I've not seen it in the flesh yet, but... Lordy...
-
Did you get it.....?
-
[quote name='mikegatward' timestamp='1349428009' post='1826103']
Would also appreciate recommendations for a good guitar tech in terms of electrics in the Yorkshire or North West
[/quote]
I haven't used him personally, but I've heard good things about Fraser Callum in Leeds... [color="#009933"]www.fcstrings.com/[/color] -
Bummer.... Sounds like a job for a screw/thread extractor a steady hand and a lot of patience.
Need new humbucker
in Repairs and Technical
Posted
To misquote Blackadder... do you want a truthful answer or a diplomatic answer? Ok here's both...
Truthful = No!
Dimplomatic = If it needs replacing then it's really worth trying to find the correct spare to keep the bass sounding as it should because a cheap replacement is very likely to have different tonal and electrical charateristcs which will affect the tone and balance between the pickups a lot, or consider swapping both out for a 'matched' pair of upgrades if funds allow.
Looking at your sig I assume it's the Ibby with the problem in which case you might find this link useful.... [url="http://ibanez.com/parts/2004_PARTS/el_bass/list/series_soundgear.html"]http://ibanez.com/parts/2004_PARTS/el_bass/list/series_soundgear.html[/url]